From 2D Maps to 3D Worlds: Printing DnD Terrain with Blender⚔️
I adore the RPG (role-playing game) genre, and I have spent plenty of time in fantastical realms causing absolute mayhem wherever I go. I have sunk way too many hours into hits like Dragon Age, Mass Effect, Cyberpunk 2077 and many more. But most of those games are PC games... and before PC games... you had tabletop games. Tabletop games like Dungeons and Dragons.
A quick refresher — what is Dungeons and Dragons?
Imagine it like this: a bunch of nerds (or nerds-adjacent) all gather around a table with a sheet of paper and a pencil. On that paper are numbers, describing a fictional character; things like: how strong the character is, how tall, what kind of stuff they have and many other pieces of highly specific information.
One of those gathered tells a story, the Dungeon Master (DM). The rest of the players interact with the world and the people described. Dungeons and Dragons is based on player agency... and it most often boils down to two goals. The goal for the DM: "How badly can I screw my players?" and for the players: "How badly can we screw the DM?". And so, we have chaos in the best way possible; this is Dungeons and Dragons (DnD).
Slightly unrelated: my sister recently came back into my life, and she is just as nerdy as I am. So when she casually mentioned she always wanted to play DnD, we immediately made plans.
We quickly decided I was going to be the DM. That means I need to come up with a story, world setting, adventure, goal and everything else you could possibly encounter. A daunting task, right? Luckily, I don't have to start from complete scratch. There is a website called DnD Beyond, where you can find characters, manuals, guides, maps and complete adventures.
I already knew the other players had no prior experience with DnD, so I figured we'd start with a premade adventure. It would be enough to get our feet wet without drowning in the many, many rules the game has. So I chose the adventure called "Dragons of Stormwreck Isle". While the players create their characters, I start thinking about setting up the game.
The tabletop experience
Traditionally, DnD is played physically. A sheet of paper representing the general area of the playable world, a bunch of miniatures representing the players' heroes, tokens for NPCs (non-player characters) to talk to, rob, stab, or whatever someone feels like doing. There are plenty of groups and communities out there that have moved their DnD session completely online, but I prefer to be together in a physical space.
Since we are going with a pre-made adventure, I get a bunch of things right out of the box. Things like the plot, side characters and story are all premade and I can use them however I see fit. And with that, come maps. And from here, I had a brainwave.
Instead of using sheets of paper to represent the map... why not use a 3D tile?
From flats to mountains
So, the goal is to create a 3D representation of a 2 / 2.5D image; take this one for example:
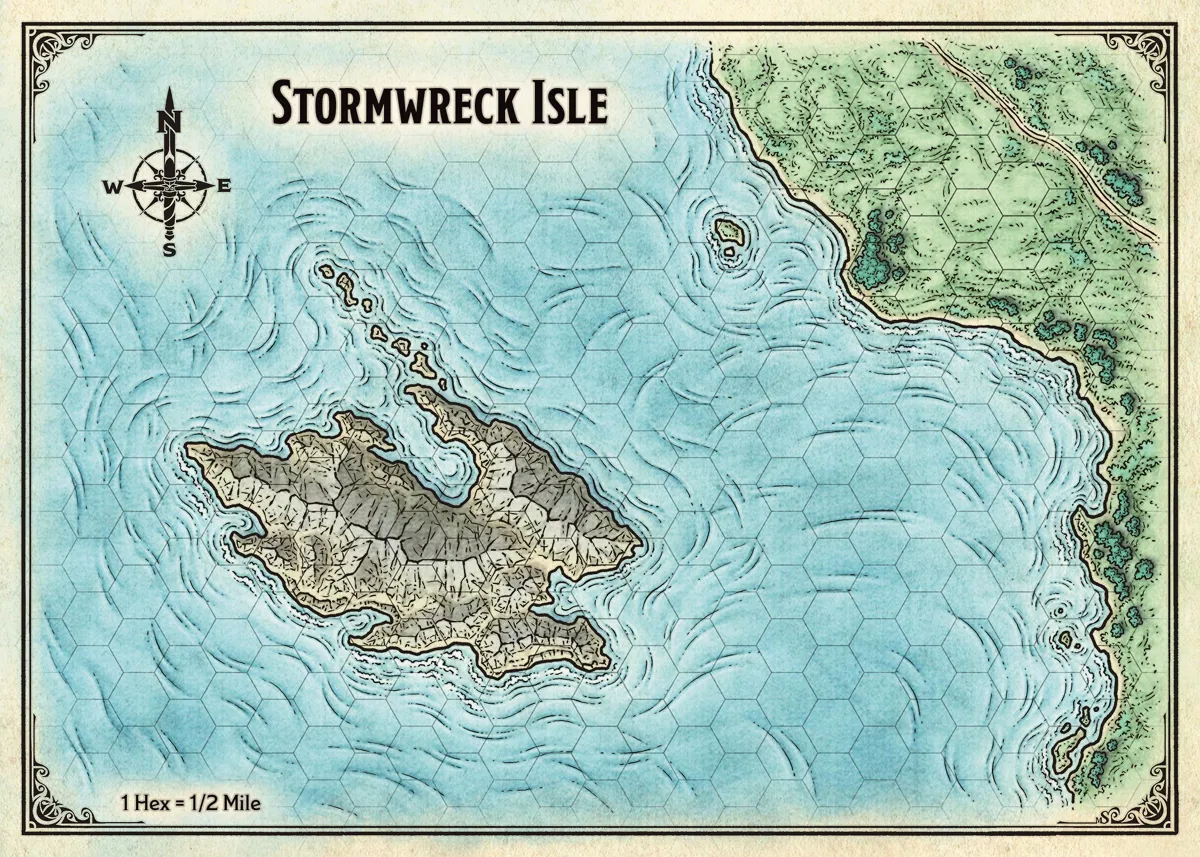
As humans with an advanced comprehension of maps and dimensions, look at this map and think: "Yeah, that tile represents a mountain and should be higher than the sea!" What we need to do is take this beautifully colored map and print it out on our 3D printer... but things are never easy...
So let's get started with the brainstorming session!
The problem
Going from a flat surface to something that points into the sky in an extra dimension. You might be surprised to learn this is not a new problem, in fact, it has been solved for a long time now. Or at least, the original problem has been. We need to map certain gradients and points to a height in 3D.
The solution: a Heightmap
A heightmap may sound technical... but it is really not that bad. Heightmaps have plenty of applications and even different variations! Most commonly, a heightmap is a black-and-white gradient map where the color informs us how high a certain point is in relation to others. So if white represents the highest point, then safe to say black is the lowest point... and every shade of grey is somewhere in the middle. Heightmaps have a broad range of applications in many different fields; a nice rule of thumb is: if we're working in a 3D space and we can see something, there is a good chance there is a heightmap involved.
Think of it like pushing a flat surface up and down based on brightness.
Depending on your requirements, you might just turn this colored map into a gray-scale version and call it a day. Oftentimes, it is that easy. So let's open up our image editor!
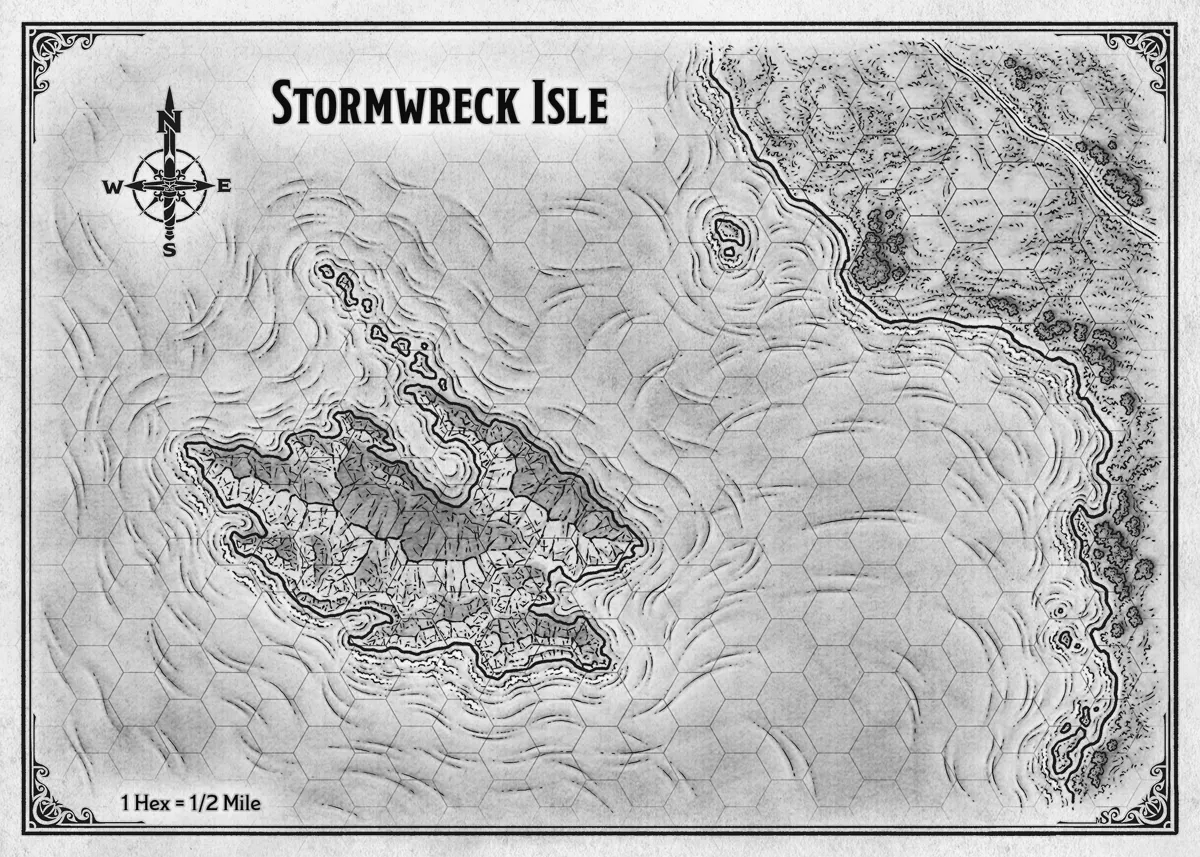
Okay, we're getting somewhere. There are some artifacts like the grids and the labels, but that's nothing we cannot solve with clever editing. There is a much bigger problem however. The way this map is colored; it shows the effects of a light source. One side of the mountain is lit up while the other side is darker. If we were to use this map and draw it in a 3D space, you would get a very unnatural-looking mountain.
I don't know about you, but I've never seen a never-ending, lopsided mountain.
I tried several other methods to get my desired result, but the grids, labels, decorations always throw off the known algorithms. This calls for something more... complex or even... manual work!
Doing it the lazy way
Before committing to draw every map in black and white manually, I decided to feed this image to ChatGPT and ask it to spit out a heightmap for me. We might as well try, right?
I told it to remove the grid, labels and other accessories. It came back with this:
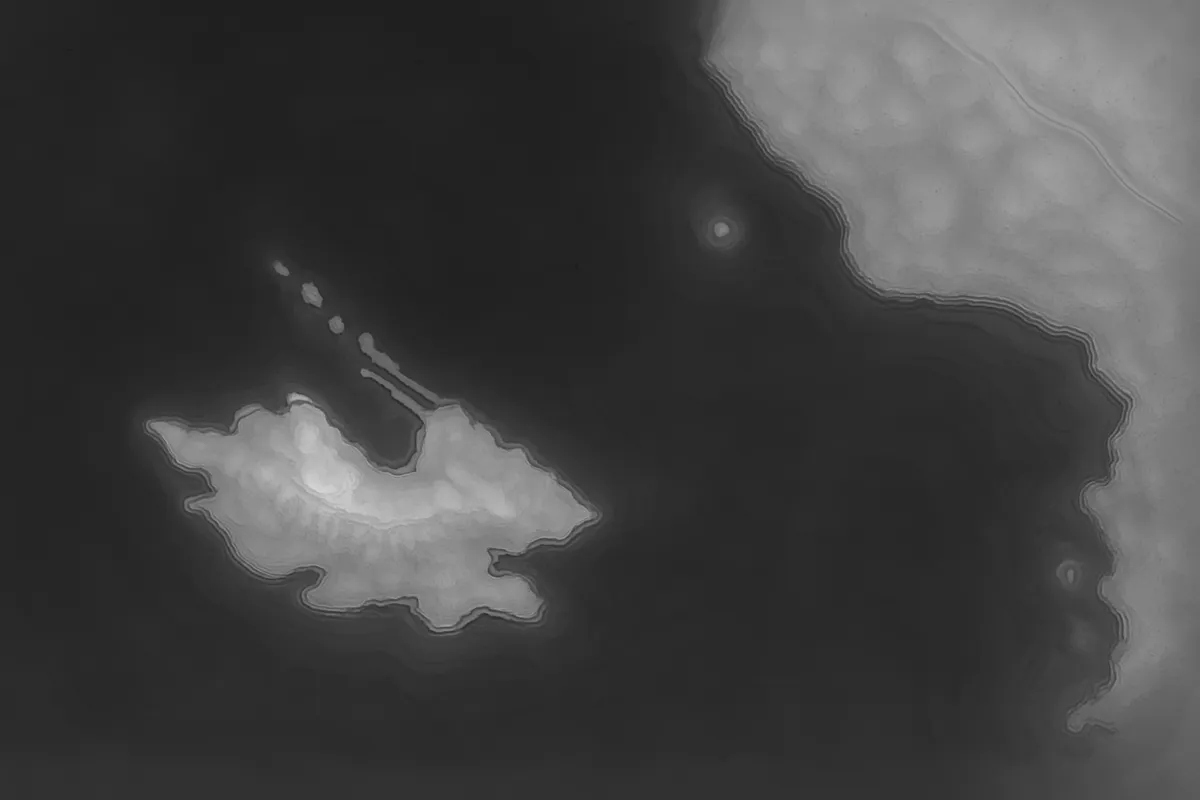
Black areas represent low areas; white represents high areas. We may have lost some details and gained a few... interesting changes to the island; but this is a result we can work with. So let's keep OpenAI in mind as we go forth.
From 2 to 3D
We have a workable heightmap. Perfect! Technically, we have all the information we need. High and low areas, peaks and shorelines. Now let's make it 3D!
When I need to do anything in 3D, I automatically go to Blender. It's free, has plenty (/way too many) features and is extendable using Python. Because I have more maps I need to process, I decided it would be easiest (and fun) to make this a plugin where I can control several aspects of the 3D process. And creating a plugin would make this entire process much easier!
In order to create a 3D object from a heightmap, you start with color-definitions, more or less a collection of mappings: `color => Y-position`. We do need to be mindful we use a gradient when we eventually have Blender loop through the map and create our object, the gradient will ensure we have smooth slopes instead of blocky terraces everywhere.
With our mapping in place, we basically have a bunch of points floating in the air at different positions. Now we need to connect them all together... in triangles. Hey... that's just how it is.
I won't bore you with all the technical details (you can see them for yourself if you follow the GitHub link below  ), but we add some magic numbers to our plugin like "Max Height Relief" and "Tile size" and we get the following result:
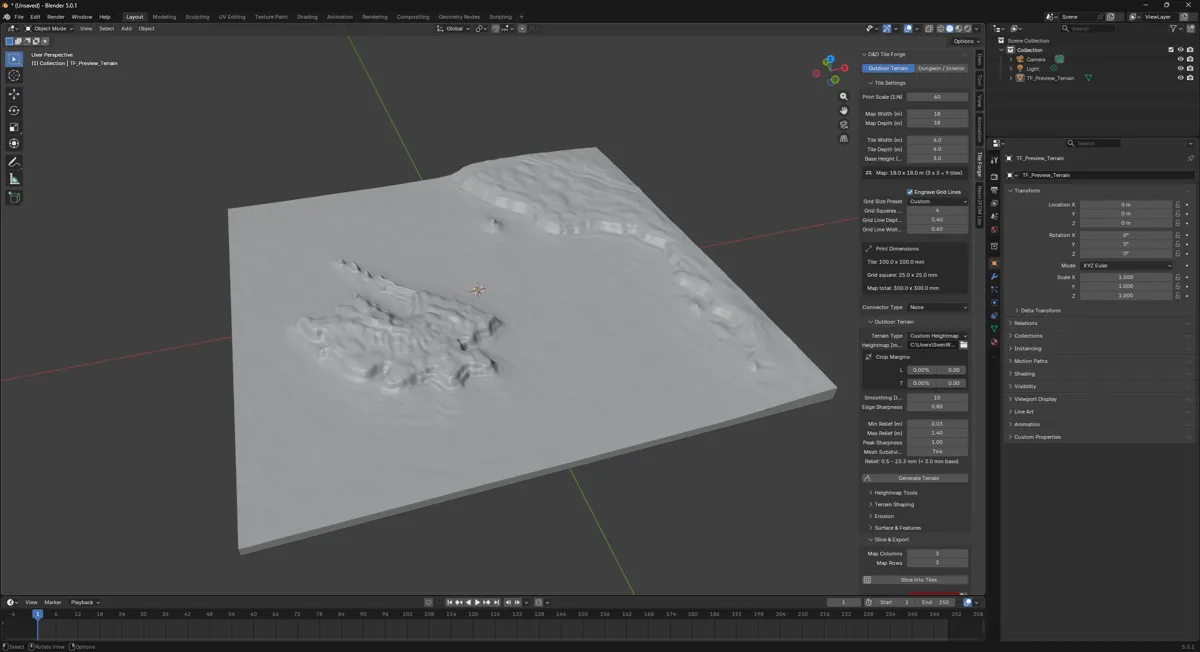
Eyyyy, that's pretty sweet-looking! From here, we can either export our object directly to an STL file, a file that keeps a record of points and triangles in a 3D space. If we do that, however, we will have to scale it down in whatever slicer we are using, because this tile... is huge, even if it doesn't look like it.
That's why we also have the ability to cut this world into slices, the plugin will even tell you how many slices you need based on different dimensions of the represented world and the physical dimensions for a tile. In the current configuration, we'd need 9 tiles.
We can even configure the type of connection we want to use between tiles, so they slot together. I didn't use that for these tiles because I selected "None" as the `Connector Type`.
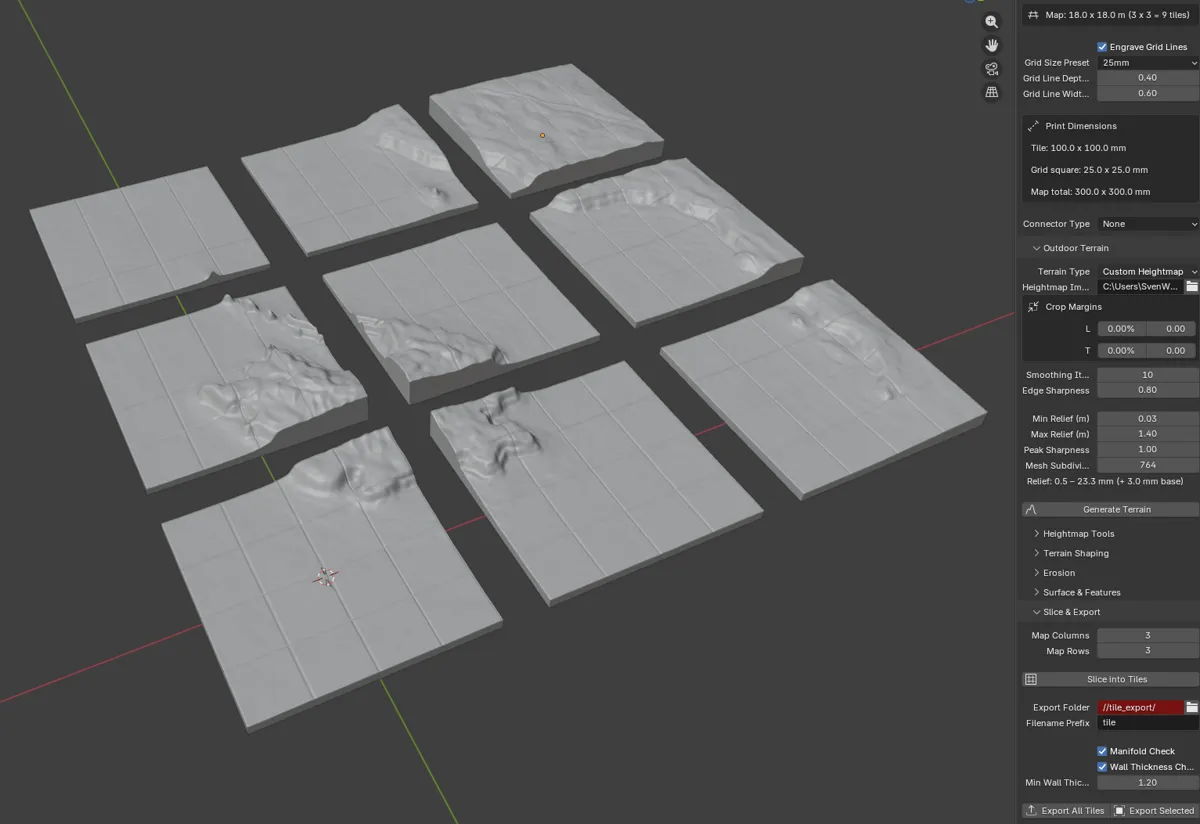
We then press "Export all" and... voila. Now all we need is the actual 3D printing!
The result
So, some hours later, after spending some time on after-care and painting, we have our first tile!
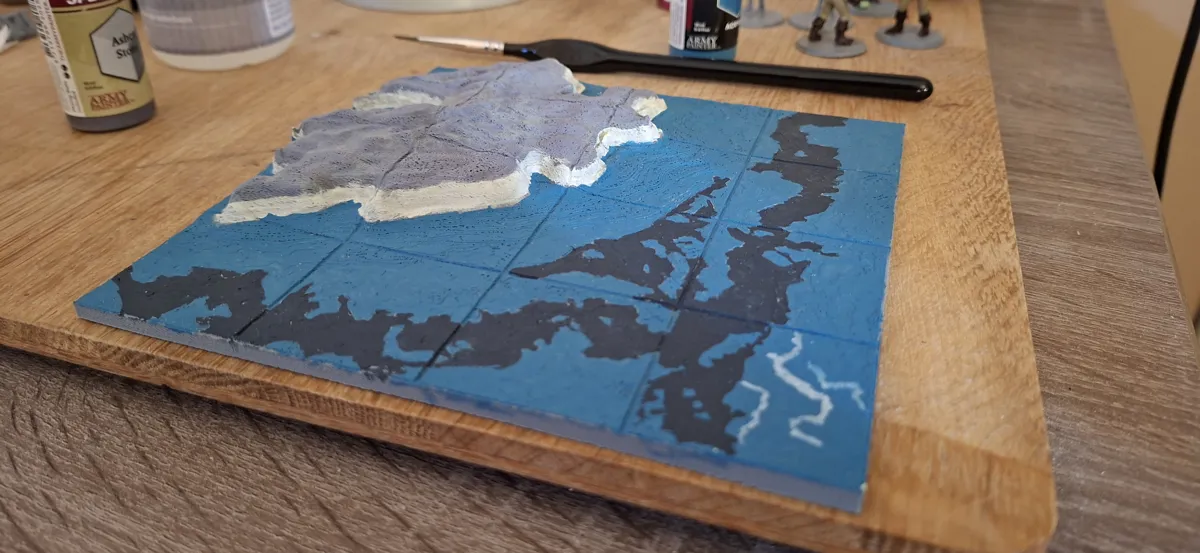
Repeat this for whatever map we have, how many times we need... and stock up on your paint supplies... and we can build our very own world!
You might have noticed that my painted tile is different from the shown images earlier. That's because the painted tile was sliced into a set of 2 x 2 instead of 3 x 3. But you can configure everything to your liking!
The plugin comes with plenty of features, like:
Heightmap → 3D terrain generation
Tile slicing for 3D printing
Configurable tile sizes
Connector systems (snap-fit tiles)
Procedural terrain tweaks
Roads & rivers
OpenAI / Gemini integration for auto heightmaps
Want to give it a spin?
You can find the plugin here! -> SHW511/Blender-Terrain-Generator
But that's it for this post! Now the hatchlings have something to really dig their claws into! Leave a rating down below.
 What did you think?

